The quick answer
Name the job before you name the cable
A digital piano can exchange several kinds of information, and the same socket does not guarantee every function. Write down the outcome you want before ordering an adapter.
Use a lesson app
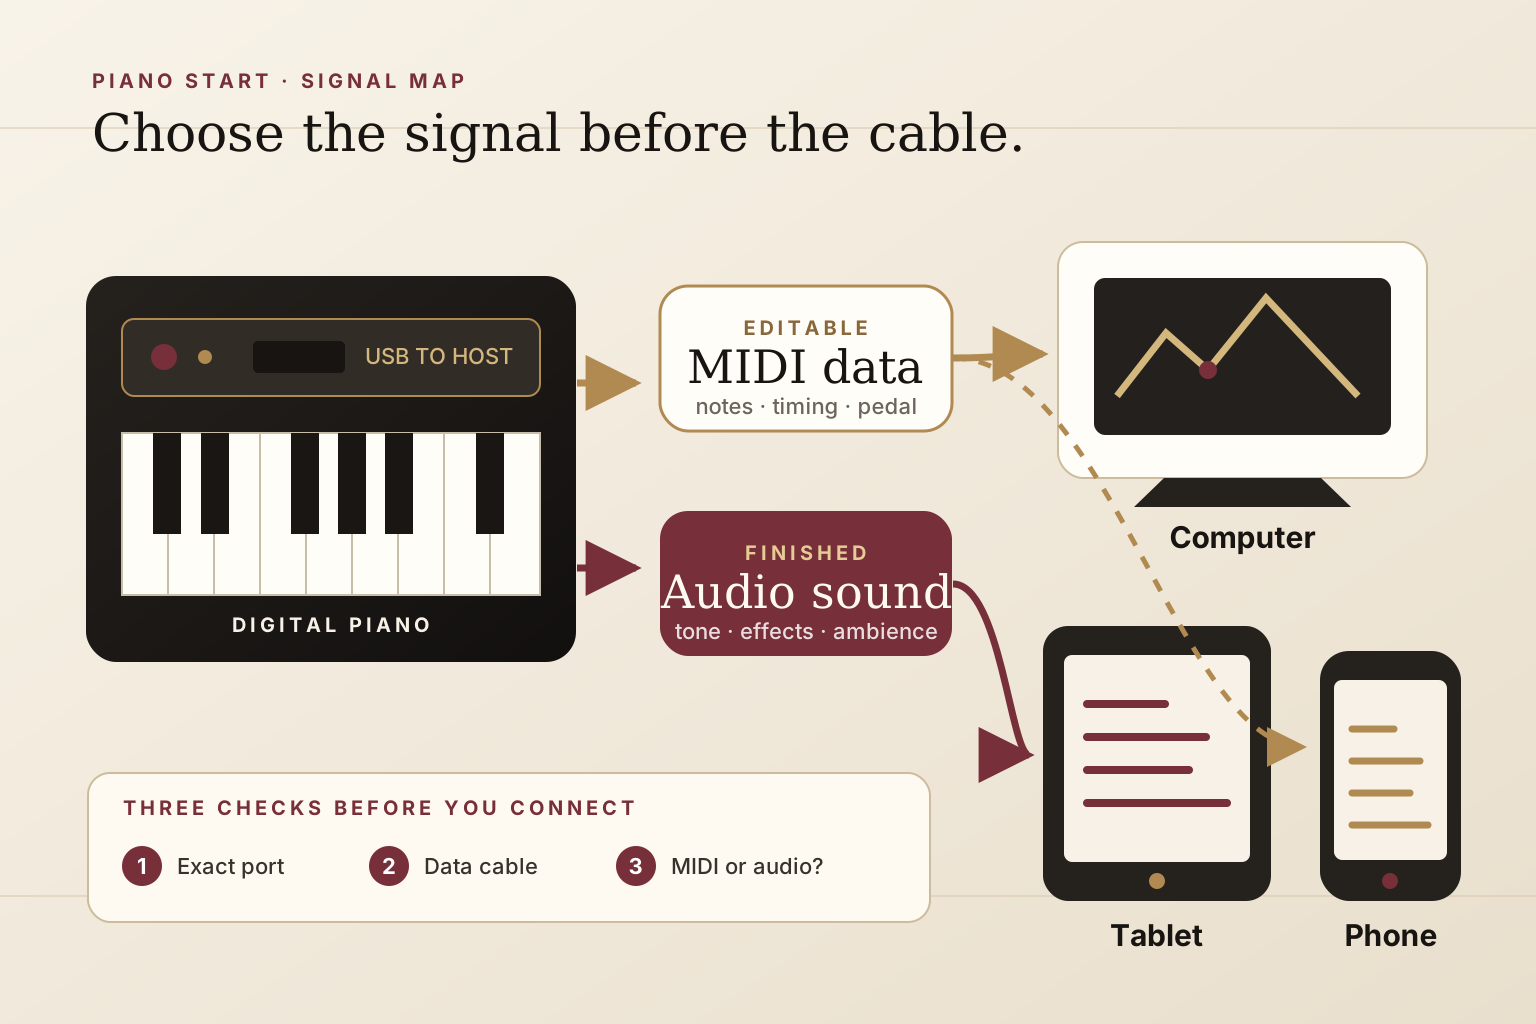
Most notation and learning apps need MIDI note data: which key you played, when, and how strongly. They do not need the piano's speaker sound.
Edit a performance
Record MIDI into a DAW when you want to correct notes, change tempo, transpose, or choose a different software piano later.
Capture this piano
Record audio when you want the exact tone, ambience, layers, and effects produced by the instrument itself.
Play along
Bluetooth audio, AUX IN, or an app's wired audio route can send a lesson or backing track through compatible piano speakers. Bluetooth MIDI is a separate feature.
Fastest diagnostic
If the app sees your key presses but the recording does not sound like your piano, the connection is probably carrying MIDI—not the piano's audio. That is expected behavior, not a failed cable.
Port map
Read the labels on the instrument, not the plug shape
Turn the piano around, photograph its labels, and check the owner's manual. Manufacturers use several connector shapes across product generations, while the printed purpose of the port tells you far more than its appearance.
| Label you may see | Typical job | What it does not prove |
|---|---|---|
| USB TO HOST / USB COMPUTER | Sends MIDI to a computer or smart device; some models also send audio | That USB audio is included or that no driver is required |
| USB TO DEVICE / USB MEMORY | Accepts supported flash storage or a named accessory | That it can connect directly to a computer |
| MIDI OUT / IN | Carries MIDI through 5-pin DIN or another documented MIDI connector | That it carries audible sound |
| LINE OUT / AUX OUT | Sends the piano's audio at a level intended for other audio equipment | That it sends editable MIDI notes |
| PHONES / OUTPUT | Feeds headphones and, on some portable models, an external audio destination | That its level is fixed or ideal for every recorder |
The MIDI Association notes that Type A is normally the host side and Type B the peripheral side. It also warns against improvising a Type-A-to-Type-A host connection. Follow the manual's exact diagram, and use a data-capable USB cable; a charge-only cable can fit perfectly and transfer nothing.
Four reliable paths
Build the shortest compatible signal chain
- 01Computer by USB
Connect the piano's documented USB TO HOST or USB COMPUTER port to the computer with a data cable. Install a manufacturer driver only when the manual or current support page requires one. Then select the piano as a MIDI input—or as an audio device if that model explicitly supports USB audio.
- 02USB-C iPad or phone
Use the cable or adapter combination specified by the instrument maker. Apple lists MIDI devices and audio interfaces among supported USB-C accessories; a powered hub can help when the accessory draws more power than the mobile device can comfortably provide.
- 03Lightning iPad or iPhone
A compatible Lightning camera adapter plus the piano's USB data cable is a common route. Some setups need the powered version of the adapter. Confirm both the piano and app support the intended MIDI or audio function.
- 045-pin MIDI or analog audio
Use a MIDI interface when the piano has DIN MIDI but no suitable USB connection. Use an audio interface when you need to capture analog LINE OUT or PHONES output. These are different boxes doing different jobs, though one interface may provide both.
Power matters
A mobile device, hub, interface, and piano can each have separate power requirements. If recognition is intermittent, simplify to one piano, one known data cable, and one powered host before adding a hub or other peripherals.
The essential distinction
MIDI describes the performance; audio is the sound
The MIDI Association's plainest definition is also the most useful: MIDI is not audio. MIDI messages describe musical actions. Audio is the waveform you can hear. Neither is universally better; they preserve different things.
Keep the performance editable
Your recording can retain note timing, duration, velocity, pedal messages, and sometimes additional expression data. Change the virtual instrument, repair a note, or slow the passage without rerecording. The final tone comes from whichever sound engine plays those instructions.
Keep the sound you heard
Audio captures the selected piano voice, layers, effects, and playing as rendered at that moment. It is ready to share and harder to reshape note by note. Record at a conservative level so loud chords do not clip.
For a polished project, record both when your hardware and software allow it: MIDI provides an editable safety net, while audio preserves the instrument's finished character. Do a ten-second test and play it back before committing to a complete take.
Inside the app
Make the software listen to the correct device
- 01Create the correct track type.
Choose a software-instrument or MIDI track for note data. Choose an audio track for the piano's audio output.
- 02Select the actual input.
Do not assume the app selected the piano automatically. Confirm its named MIDI port, audio interface input, or class-compliant USB device in settings.
- 03Arm, play, and watch.
A moving MIDI indicator proves data is arriving; an audio meter proves a waveform is arriving. Neither alone proves you are monitoring the right sound.
- 04Resolve doubled notes.
If every key sounds twice, the piano may be playing locally while the app echoes MIDI back. Use the app's monitoring setting or the piano's Local Control setting as documented—do not change random MIDI parameters.
- 05Reduce delay at the source.
For audio recording, use wired headphones and the interface's direct monitoring where available. For software instruments, a smaller audio buffer reduces latency but asks more of the device.
If the goal is simply quieter practice, a direct headphone connection is normally simpler than routing sound through a computer. Your first-piano priorities still begin with touch and repeatable practice; see the complete beginner buying guide.
A clean test order
Fix no connection, no sound, or unwanted delay
Confirm compatibility
Read the exact model's manual and app compatibility list. A port that works with storage may not work with a host; Bluetooth audio does not imply Bluetooth MIDI.
Prove the cable carries data
Use a short, known-good data cable and remove adapters or hubs where possible. Reconnect in the order recommended by the manufacturer.
Look for recognition
Check the operating system and app device list. If the piano never appears, investigate the cable, adapter, power, driver, and port before changing track settings.
Separate MIDI from audio
If note indicators move but audio meters do not, you have a MIDI path. Load a software instrument or build a separate audio path.
Test one direction at a time
First prove piano-to-device input. Then test device-to-piano return. Finally add Bluetooth, a hub, speakers, or a second app.
Before buying anything else
Write down the piano model, mobile-device connector, operating-system version, app, and exact function you need. Those five facts make a compatibility check useful—and prevent a drawer full of almost-right adapters.
Primary references
Technical details worth verifying
Primary and manufacturer documentation is linked for the technical claims used in this guide. Product support, accessories, and regional specifications can change.
- MIDI Association: MIDI is performance data, not audio
- MIDI Association: USB-MIDI ports, hosts, and cable roles
- Yamaha Smart Device Connection Manual
- Apple: USB-C iPad support for MIDI devices and audio interfaces
- Apple: Lightning to USB 3 Camera Adapter
- Roland: computer connection requires a data-capable USB cable
Clear answers
Frequently asked questions
01Can I connect any digital piano to an iPad?
No. The iPad supports many USB MIDI devices and audio interfaces, but the piano, adapter, power arrangement, operating system, and app must all support the intended connection. Start with the exact piano manual and app compatibility list.
02Does USB from a digital piano carry sound?
Sometimes. Many USB TO HOST ports carry MIDI only; some models carry both MIDI and audio. The connector shape cannot answer this—check the specifications or manual for USB audio support.
03Why does my computer detect the piano but record no audio?
It may be receiving MIDI performance data rather than an audio signal. Load a software instrument for the MIDI track, or connect a supported USB-audio or analog-audio path to record the piano's own sound.
04Can Bluetooth replace the USB cable?
Only when both devices and the app support the right Bluetooth function. Bluetooth MIDI can work for note data, while Bluetooth audio is a separate feature and often introduces enough latency to feel distracting for live playing.
05Do I need an audio interface for a digital piano?
Not for ordinary USB MIDI. You usually need an interface when recording analog LINE OUT or headphone audio, or when the piano lacks the USB-audio function your project requires.